Introduction
If you’re a WordPress plugin developer looking to publish your plugin on the official WordPress Plugin Repository, you’ll need to use SVN (Subversion) to manage your plugin’s source code.
Unlike Git, WordPress uses SVN for its plugin directory, so setting this up locally—especially on Windows—requires a few extra steps. Don’t worry though, this guide has you covered whether you’re a beginner or just need a refresher.
This guide assumes that your plugin has already been approved for hosting on the WordPress repository.
⚠️ If you’re not yet approved and need help getting there, drop a comment below! I’ll be happy to put together a detailed guide on “How to submit your WordPress plugin for repository approval.”
In the meantime, you can also refer to the official WordPress plugin developer handbook for detailed technical instructions.
🚀 What You’ll Learn in This Guide:
✅ How to install an SVN client on Windows
📦 How to upload your first plugin to the WordPress SVN repo
🔁 How to update your plugin later (like releasing a new version)
🧠 What is SVN and Why WordPress Uses It
SVN (Subversion) is a version control system used to track and manage changes to source code over time. While most modern developers prefer Git, the official WordPress Plugin Directory still uses SVN — and for good reason.
Using SVN allows plugin developers to:- Manage multiple versions (releases) of a plugin.
- Easily roll back to a previous version.
- Keep development and production code organized using
trunk/,tags/, andassets/.
How To Install SVN Clients On Windows
SlikSVN is great for developers who prefer working in Command Prompt (CMD) or scripting plugin deployment tasks.⚠️ Important Note: While TortoiseSVN is a popular graphical SVN client (and can be configured for command-line use), this guide focuses on a clean, CLI-based workflow. If you’re comfortable with the command prompt or planning to automate deployments, SlikSVN is the better fit.
- Visit the official site: 👉https://sliksvn.com/download/
- Download and run the Windows installer.
- During installation, be sure to check the box that says: “Add to PATH”
- After installation, open Command Prompt and type:If everything is set up correctly, you’ll see output like:bash
svn --versionbashsvn, version 1.14.2-SlikSvn (SlikSvn/1.14.2)...............
How To Upload a New Plugin to WordPress SVN
Your repository URL will look like this:⚠️ Note: We’re assuming that your plugin has already passed the review process and you have your plugin slug and SVN repository URL. If not, please refer to the plugin submission process first.
https://plugins.svn.wordpress.org/your-plugin-slug/Step 1: Checkout the Empty SVN Repository to Your Local System
C:\Users\YourName\Desktop\your-plugin-slug
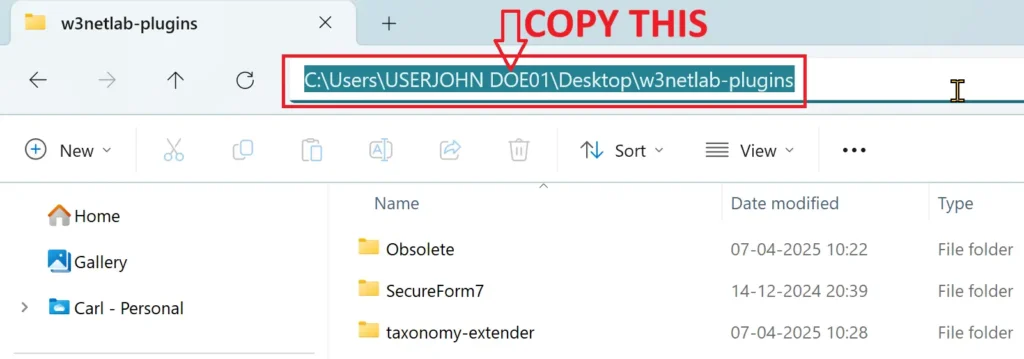
Open that folder in File Explorer. In the File Explorer address bar, click on the path to highlight it, and copy the full path.
💡Note:In the following demonstration, the example path
C:\Users\YourName\Desktop\your-plugin-slugis equivalent to the actual path used:C:\Users\USERJOHN DOE01\Desktop\w3netlab-plugins
C:\Users\USERJOHN DOE01\Desktop\w3netlab-pluginssvn checkout https://plugins.svn.wordpress.org/w3netlab-plugin/ "C:\Users\USERJOHN DOE01\Desktop\w3netlab-plugins"📦 This command tells SVN to:
Connect to your plugin’s repository (
https://plugins.svn.wordpress.org/your-plugin-slug/)Download (checkout) the repository’s structure into your local folder (
your-plugin-slug)
📁 After successful checkout, your folder will contain the standard WordPress plugin SVN structure:
your-plugin-slug/
├── assets/     ← Banner & screenshot images (not bundled in ZIP)
├── tags/       ← Version snapshots (like 1.0.0, 1.1.0)
└── trunk/      ← Main plugin code (latest working version)
trunk/ folder in the next step.Step 2: Add Plugin Files to the /trunk/ Folder
Move all your plugin files — including your main PHP file, other code, subfolders, and readme.txt/ — into the trunk/ directory.
⚠️ Important: Your readme.txt file must be properly formatted according to WordPress standards.
Example folder after copying:
trunk/
├── my-plugin.php
├── includes/
├── css/
├── js/
└── readme.txt
Also, place plugin page assets (e.g. screenshots and banners) into the assets/ folder (not inside trunk/).
Step 3: Create the New Version Tag in /tags/1.0.0
/tags/1.0.0 directory.To tag version 1.0.0 (replace with your version):
cd "C:\Users\YourName\Desktop\your-plugin-slug"
svn copy trunk tags/1.0.0trunk/ folder as tags/1.0.0/.Step 4: Add All Files to SVN Version Control
svn add command:cd "C:\Users\YourName\Desktop\your-plugin-slug"
svn add assets/* --force
svn add trunk/* --force
svn add tags/* --force - The
--forceflag ensures all subdirectories and files are added. - You can also use
svn statusto verify which files are being tracked (A means added).
Step 5: Commit Your Plugin Files to the WordPress Repository
svn commit command:svn commit -m "Initial commit: Uploaded plugin files to WordPress SVN"- Username: This is your WordPress.org login username (not email).
- Password: It’s not your WordPress.org account password instead it is a specific to wordpress svn repo. SVN passwords separate your commit access from your main WordPress.org account credentials. SVN passwords cannot be used for any other services on WordPress.org, including logging into your account.
- While logged in your wordpress.org account, visit your profile at https://profiles.wordpress.org.
- Click on the Account & Security tab.
- Click SVN credentials
- Click Generate Password
- Click Copy next to the newly generated password to copy it to your clipboard.
Once commit successful, the files in trunk/ and assets/ are now live in the repository.
And your wordpress plugin will be available to the users via wordpress official repository within few minutes.
Step 6: Verify Plugin is Live
After committing, your plugin should appear on:
https://wordpress.org/plugins/your-plugin-slug/Depending on cache and sync, it might take a few minutes to reflect changes.
How to Push an Update to Your WordPress Plugin in the SVN Repository
After your plugin is published and live in the WordPress Plugin Directory, you’ll eventually need to release updates — whether it’s fixing bugs, improving functionality, or releasing new features. This section explains how to safely update your plugin in the SVN repository.
Step 1: Option1 - Navigate To Your Local SVN Working Copy and run svn update
You’re not the only one working on the project, right?
Even if you’re the primary developer, there’s always a chance that collaborators — or even automated systems — have made changes to the WordPress plugin repository. To stay in sync with the latest version and avoid pushing outdated or conflicting code, it’s essential to always update your local copy before making or committing any changes.
The svn update command synchronizes your local working copy with the central repository, pulling in any updates made by others (or by you on another device).
cd "C:\Users\YourName\Desktop\wordpress-plugins\your-plugin-slug"svn updateHere’s what svn update does:
- Download new changes made by others from the central SVN repository
- Merge them into your local copy if no conflict exists
- Leave your own local changes (like uncommitted edits) untouched
Risks of Skipping svn update
If you skip updating your local copy before making changes or committing, you might:
- Overwrite someone else’s work.
- Push buggy or outdated code by accident.
- Break the plugin for everyone on WordPress.org.
Imagine pushing an update that unknowingly removes an important fix added by a teammate or reintroduces a bug that was already patched. These are disasters you can avoid by following the simple best practice of running svn update first.
Option2 - Create a Fresh Working Copy folder and Run svn checkout
If you don’t have the folder anymore, simply create working copy folder, and checkout the repository again:
svn checkout https://plugins.svn.wordpress.org/your-plugin-slug/ "C:\Users\YourName\Desktop\wordpress-plugins\your-plugin-slug"Step 2: Now Run svn status
The svn update command make working up to date with the latest version from the repository.
But what if you already had some local changes? SVN doesn’t overwrite them — instead, it merges them if possible and flags them as modified (M) or conflicted (C).
Running svn status immediately afterward will show:
M→ You still have local modificationsC→ A conflict occurred during the update!→ Some files are missing (locally deleted but not properly removed from SVN)?→ New files/folders not added to version control yet
readme.txt) that you also modified locally, an update might cause a conflict.Running svn status right after svn update shows you:
C trunk\readme.txtM trunk\readme.txt
? debug.log
! trunk\missing.phpThis alerts you to:
Possible unintended or delibrate edits (
M)Untracked files you forgot to ignore (
?)Files you deleted manualy but forgot to run
svn deletefor (!)
So you can take action: revert, add, delete, or ignore as needed.
Step 3: Update Files Inside the /trunk/ Folder
Make all the necessary updates in the trunk/ directory. For example:
- Update your plugin’s main
.phpfiles - Update or add modules, CSS/JS files, etc.
- Update your
readme.txtfile (especially the “Stable tag” and changelog) - If you have new screenshots or banners, update them in the
assets/folder
✅Correct Way to Delete a File in SVN
In SVN (Subversion), if you want to delete a file from your local working copy and the repository, you should never delete it manually using File Explorer.
Instead, you should use the svn delete command so that SVN properly tracks the deletion and prepares it for commit.
- Open Command Prompt (in the folder where the file is located).
- Run this command to delete the file via SVN (replace the example path with the actual file path):cmd
svn delete trunk\modules\example-widget.php - Confirm the deletion with SVN:You’ll see:cmd
svn statusD means “scheduled for deletion.”cmdD trunk\modules\example-widget.php
Step 4: Commit the Update to the WordPress SVN Repository
Once you’re satisfied with the changes, run:
svn commit -m "Updated plugin to version 1.0.1 – added new feature X and fixed bug Y"
You’ll be prompted to enter your WordPress.org username and password. If you use Two-Factor Authentication (2FA), use an App Password instead of your account password.
✅ Final Tips for Successful Plugin Management
- Do not manually delete the file in File Explorer or using
delcommand in terminal - Always update the Stable tag in
readme.txtto match your latest release version. - Do not put
assets/images in thetrunk/folder — they must be in/assets/only. - Tag each release using
svn copy, not by editing thetags/folder manually. - Test your plugin thoroughly before committing.
- Use meaningful commit messages for better tracking.
Conclusion
Uploading and managing a WordPress plugin using SVN may feel different at first, especially if you’re used to Git. However, by following this structured guide, you’ll be able to confidently upload new plugins, manage updates, and ensure your plugin is professionally maintained on the WordPress repository.
Need help fixing SVN conflicts or automating this with scripts? Feel free to reach out or comment below — we’re here to help!