
Introduction
A practical step-by-step guide using PuTTY, WinSCP, Cloudflare DNS, CyberPanel backup/restore, SSL, and LiteSpeed Cache
Migrating a live WordPress website from one cloud server to another can feel risky, especially when the website is already connected with Cloudflare DNS, SSL, CyberPanel, databases, and caching.
In this guide, I will explain the complete migration process from DigitalOcean CyberPanel to Oracle Cloud Infrastructure CyberPanel, also called OCI CyberPanel.
This guide is written in a practical way so that you can follow easily.🚀
Let’s get started!
1. What we are doing
We are migrating a WordPress website from the old server to a new Oracle Cloud server.
Old setup:
DigitalOcean Droplet
CyberPanel installed
OpenLiteSpeed web server
Multiple WordPress websites hosted
Cloudflare DNS used
New setup:
Oracle Cloud OCI instance
Ubuntu 22.04
CyberPanel installed
OpenLiteSpeed web server
One WordPress website per OCI instance
Cloudflare DNS used
LiteSpeed Cache enabled
2. Why use Oracle Cloud OCI for WordPress hosting?
Oracle Cloud provides Always Free compute options that can be useful for small WordPress websites, testing servers, lightweight business websites, personal blogs, and development environments.
For this setup, we will use a small Always Free OCI compute instance. It can run a lightweight WordPress website if the server is configured properly.
The instance shape we will use:
Shape: VM.Standard.E2.1.Micro
OCPU: 1
RAM: 1 GB
Network: 0.48 Gbps
OS: Ubuntu 22.04
This is not a powerful server, so the configuration must be done carefully. The most important steps are adding swap memory, keeping the CyberPanel installation lightweight, and using LiteSpeed Cache with Cloudflare.
3. Important recommendation before starting
The most important rule to remember is:
⚡ Never change DNS before testing the migrated website!
First, we will prepare the new OCI server, then restore the website, test it privately using the Windows hosts file, and only then change the Cloudflare DNS.
Do not delete the old DigitalOcean server immediately.
Do not change Cloudflare DNS before testing the website.
Always create a fresh CyberPanel backup.
Use the Windows hosts file to test the migrated site first.
Keep the old server active for at least 3 to 7 days after migration.
This gives you a rollback option if anything goes wrong during or after the migration.
4. Overall migration flow
The complete migration process looks like this:
Create the OCI instance
Connect to the server using PuTTY
Update Ubuntu packages
Add a 2 GB swap file
Open the required OCI network ports
Install CyberPanel
Create a fresh backup from the old DigitalOcean CyberPanel server
Transfer the backup to the OCI server using WinSCP
Restore the backup in OCI CyberPanel
Fix file ownership and permissions
Test the website privately using the Windows hosts file
Change the Cloudflare DNS records
Issue SSL for the website
Configure SSL for the CyberPanel hostname
Enable the Cloudflare proxy
Install and verify LiteSpeed Cache
Step 1: Create a New Oracle Cloud OCI Instance
To begin the migration, create a fresh Oracle Cloud compute instance. This instance will become the new CyberPanel server where the WordPress website backup will be restored.
In the Oracle Cloud Console, go to:
Menu → Compute → Instances → Create InstanceOracle Cloud will open a step-by-step instance creation wizard. Complete each section carefully before creating the instance.
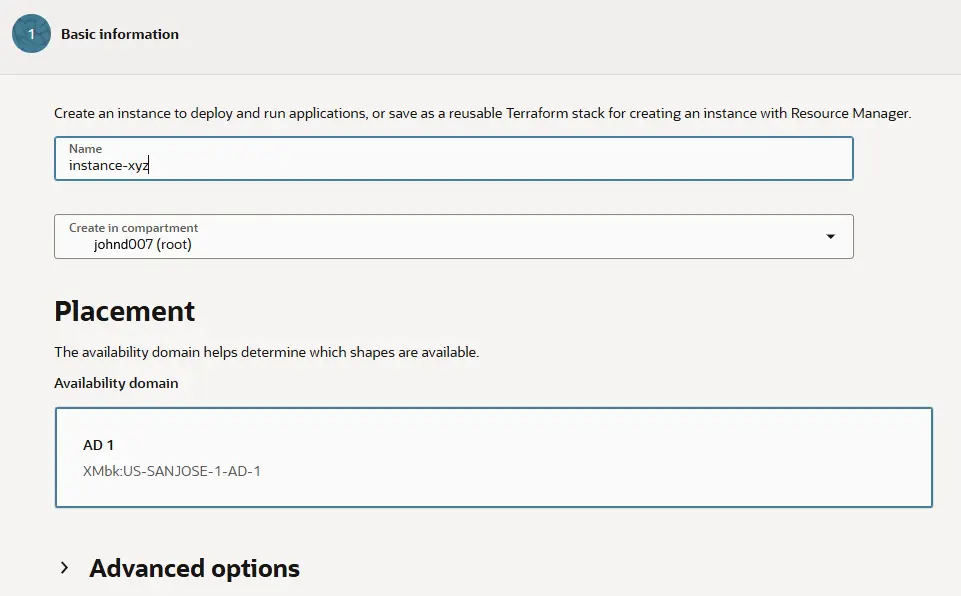
1. Basic Information
In the Basic information section, enter a clear instance name.
Example:
instance-xyzThe compartment can be left as the default/root compartment unless you are already using a separate compartment structure.
Example:
johnd007 (root)In the Placement section, Oracle Cloud usually selects the availability domain automatically.
AD-1For this migration setup, the default placement setting is fine.
2. Select the Operating System Image
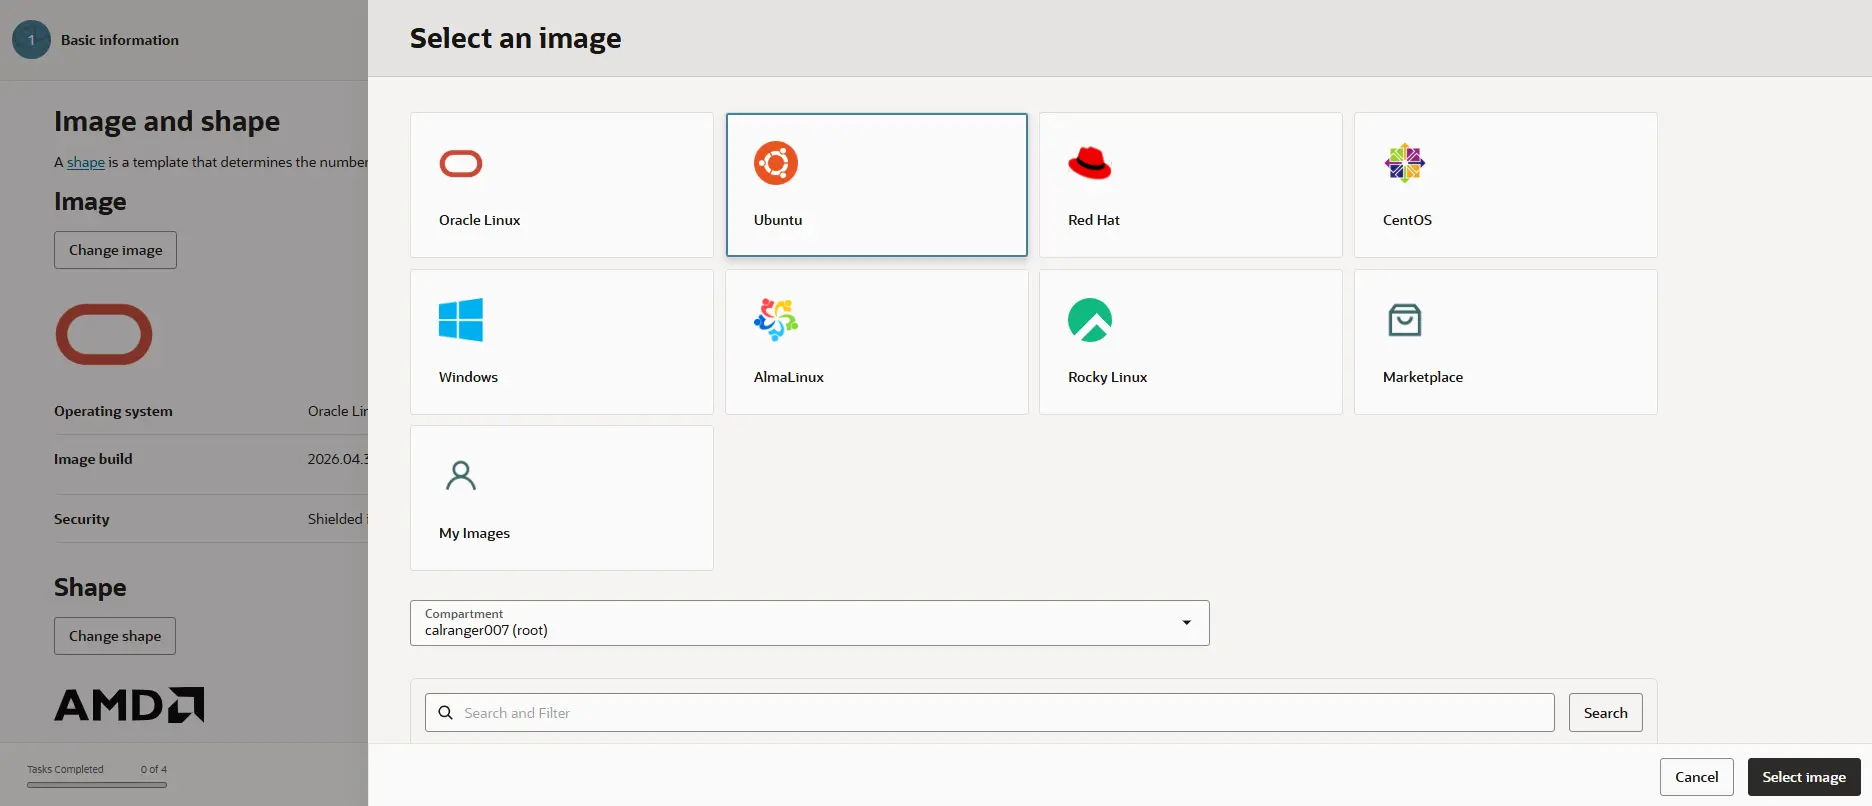
In the Image and shape section, click:
Change imageSelect:
UbuntuFrom the Ubuntu image list, choose:
Canonical Ubuntu 22.04For CyberPanel, Ubuntu 22.04 is a stable and compatible choice.
Avoid these options for this setup:
Ubuntu Minimal
Ubuntu 24.04
Ubuntu aarch64
Oracle Linux
Windows
For this guide, avoid the aarch64 image because it is for ARM-based instances. Use the standard x86_64 Ubuntu image for better CyberPanel compatibility.
3. Select the Correct OCI Shape
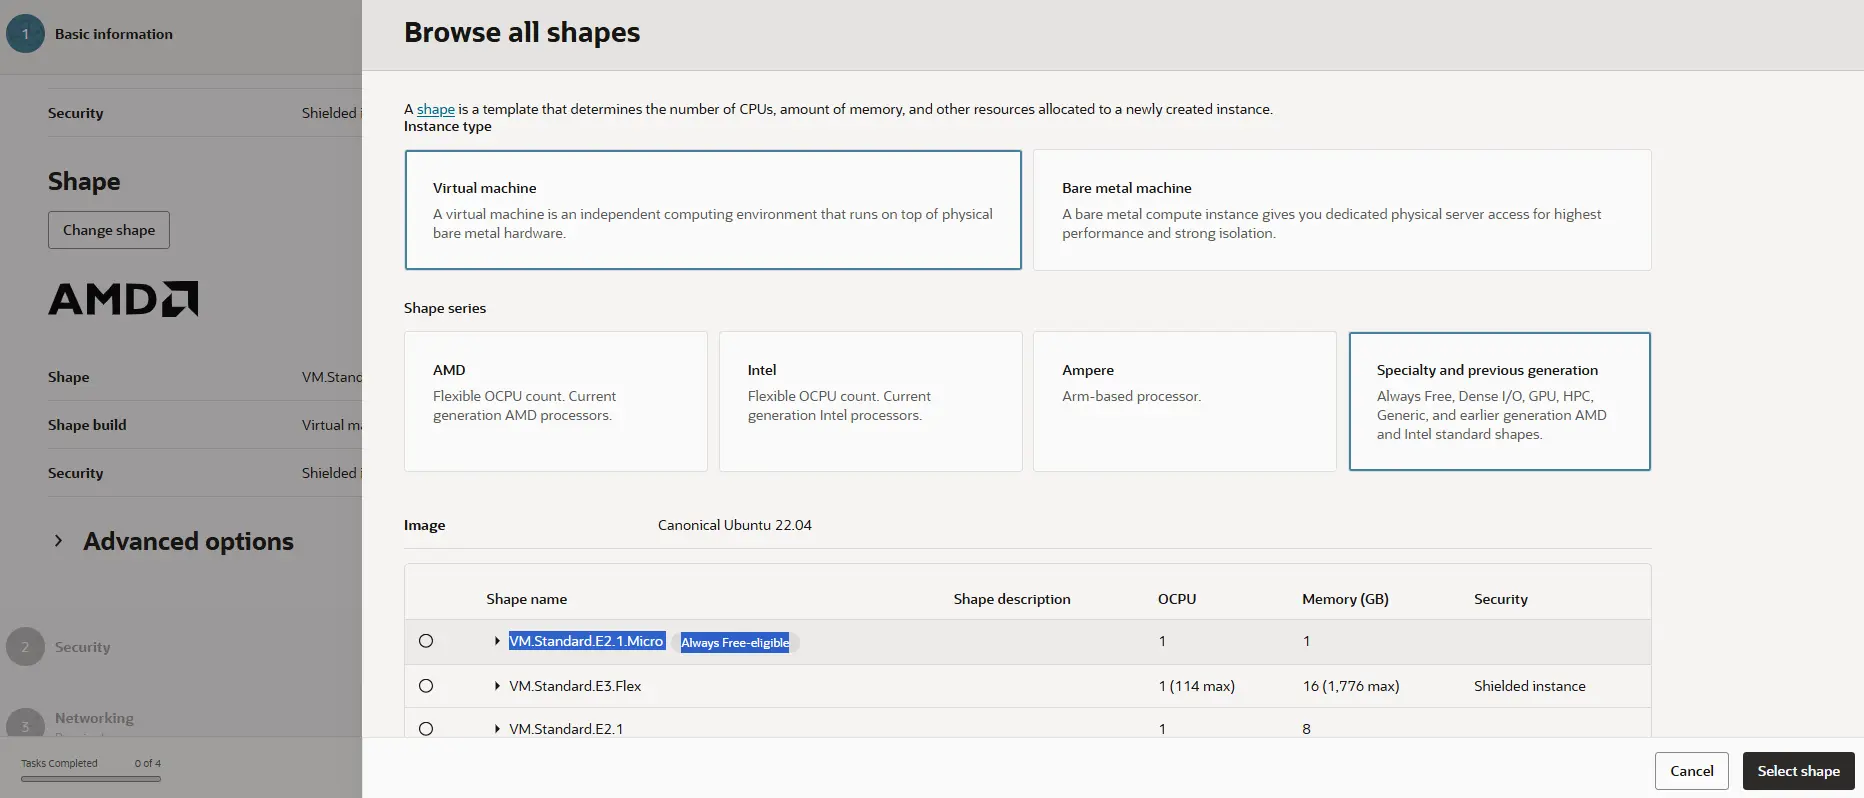
After selecting Ubuntu, click:
Change shapeIn the shape selection window, select:
Virtual machineUnder Shape series, choose:
Specialty and previous generationFrom the available shape list, select:
VM.Standard.E2.1.Micro
Always Free-eligible
This shape provides:
OCPU: 1
Memory: 1 GB
Network bandwidth: 0.48 Gbps
This shape is suitable for a lightweight WordPress website when it is properly optimized with swap memory, Cloudflare, and LiteSpeed Cache.
Important: Choose the AMD/x86-based micro shape, not an ARM/aarch64 shape.
4. Security
Leave it default.
5. Configure Networking
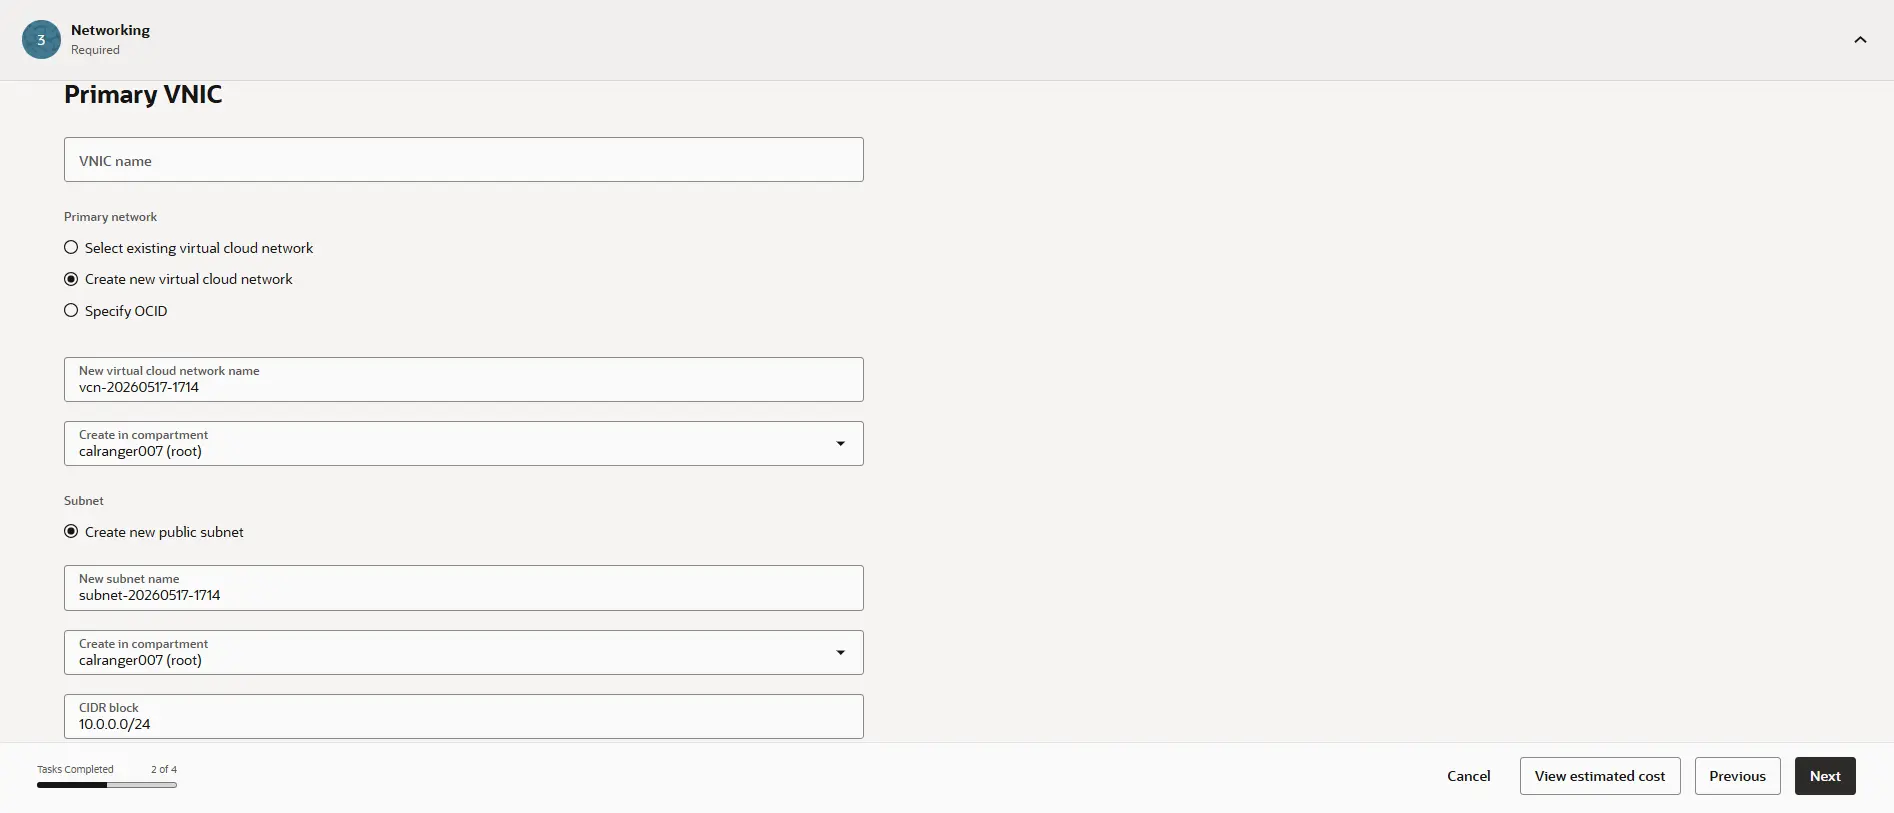
In the Networking step, Oracle Cloud asks whether you want to use an existing VCN or create a new virtual cloud network.
For a fresh setup, choose:
Create new virtual cloud networkOracle Cloud will automatically create:
New VCN
New public subnet
CIDR block: 10.0.0.0/24
For additional servers, you can also use an existing VCN if it already has the required security rules configured.
Both approaches are valid:
Option 1: Create a new VCN and public subnet
Option 2: Use an existing VCN if it is already configured
If you use an existing VCN, make sure its security list or NSG allows these ports:
22
80
443
8090
These ports are required for SSH access, website access, SSL/HTTPS traffic, and CyberPanel access.
6. Public IPv4 Address Assignment
This is an important step.
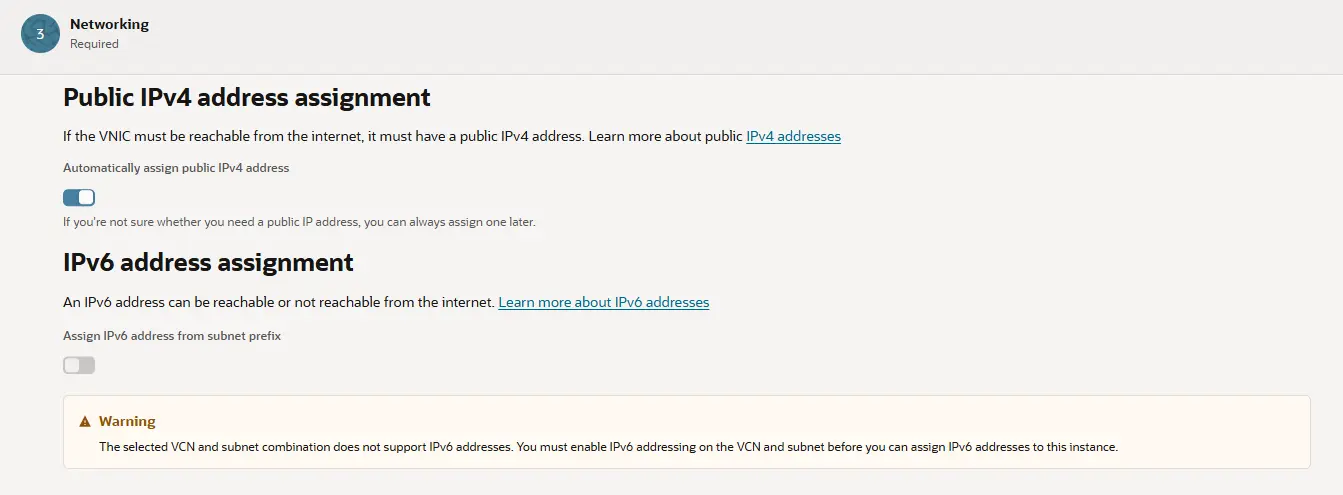
Under Public IPv4 address assignment, make sure public IPv4 assignment is enabled.
The server must have a public IPv4 address because it needs to be accessed by:
PuTTY SSH
CyberPanel admin panel
Website HTTP/HTTPS traffic
Cloudflare DNS
WinSCP file transfer
Enable this option:
Automatically assign public IPv4 addressIf this option is disabled, the server may be created without a public IP address. In that case, direct PuTTY, WinSCP, CyberPanel, and website access will not work.
The IPv6 warning can be ignored for this setup if the server is being configured with IPv4 only.
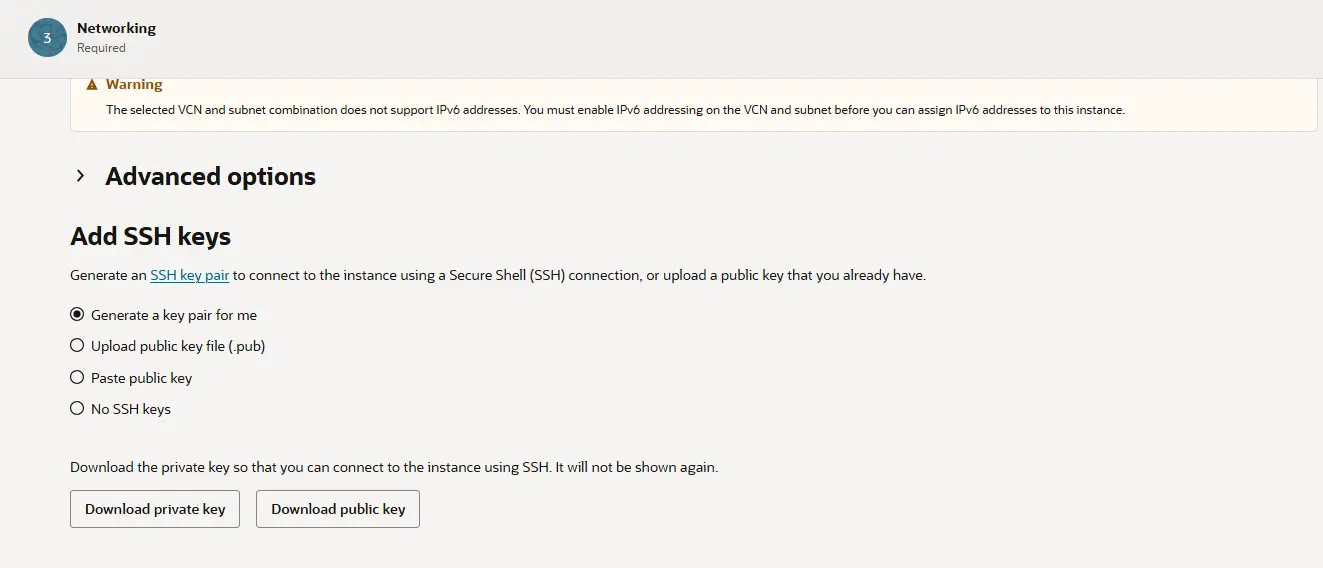
7. Add SSH Keys
SSH keys are required to connect to the OCI instance securely.
Oracle Cloud provides these SSH key options:
Generate a key pair for me
Upload public key file
Paste public key
No SSH keys
For a beginner-friendly setup, choose:
Generate a key pair for meAfter selecting this option, Oracle Cloud shows two download buttons:
Download private key
Download public key
Download both files.
The private key is the most important file because it is required to connect to the server using PuTTY or WinSCP.
Save both files in a safe folder on your Windows computer.
Example folder:
D:\OCI-SSH-Keys\Important safety notes:
Never share the private key.
Never upload the private key publicly.
Keep a backup copy in a safe location.
Do not lose the private key.
If the private key is lost and password login is not enabled, SSH access to the server may become difficult.
8. Boot Volume and Storage
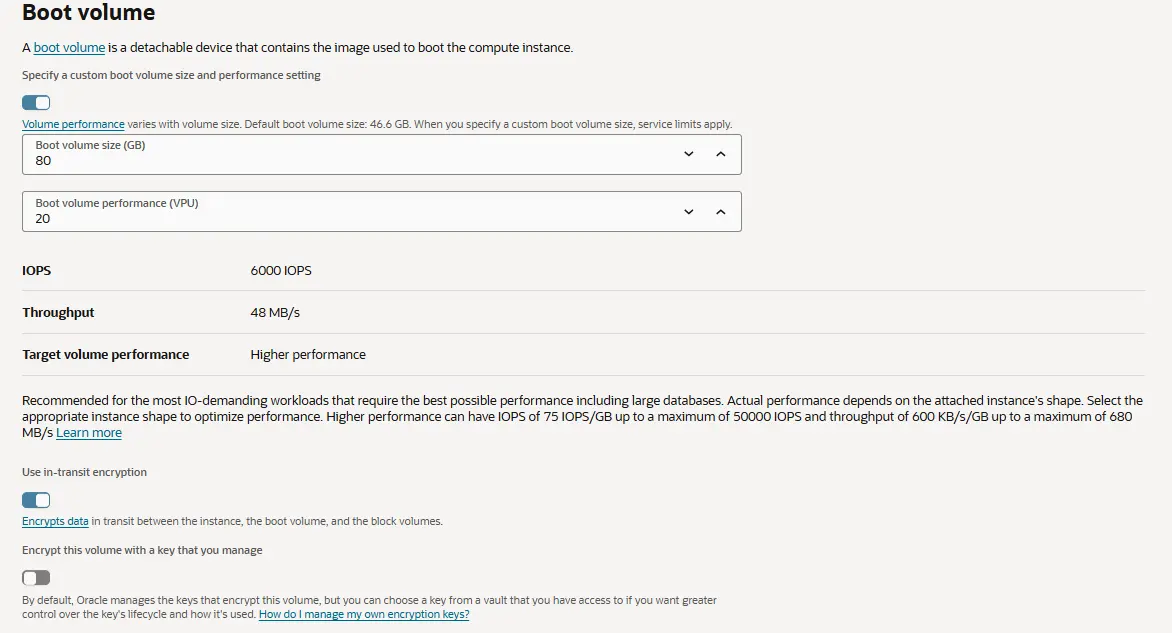
In the Storage step, Oracle Cloud shows the boot volume settings.
For a small WordPress website, the default boot volume is usually enough.
In this setup, the server had around:
47 GB root diskThis is enough for:
Ubuntu
CyberPanel
OpenLiteSpeed
MariaDB
WordPress files
Temporary backup files during migration
Oracle Cloud may also show an option to attach a block volume.
For this migration, a separate block volume is not required.
Recommended setting:
Default boot volume
No additional block volume
For larger websites or media-heavy WordPress sites, you can increase the boot volume size during instance creation, increase it later, or attach a separate block volume.
9. Review and Create the Instance
At the final step, Oracle Cloud shows a summary of the selected configuration.
Review these details carefully:
Name: instance-wpcp or instance-wpcp2
Operating System: Canonical Ubuntu 22.04
Shape: VM.Standard.E2.1.Micro
OCPU: 1
Memory: 1 GB
Public IPv4: Enabled
SSH key: Added
Boot volume: Default
If everything looks correct, click:
CreateOracle Cloud will start creating the instance.
After a few moments, the instance status should become:
RunningOnce the instance is running, copy the public IPv4 address.
Example:
178.152.10.15This public IP address will be used for:
PuTTY SSH login
WinSCP file transfer
CyberPanel access
Cloudflare DNS update
Website migration testing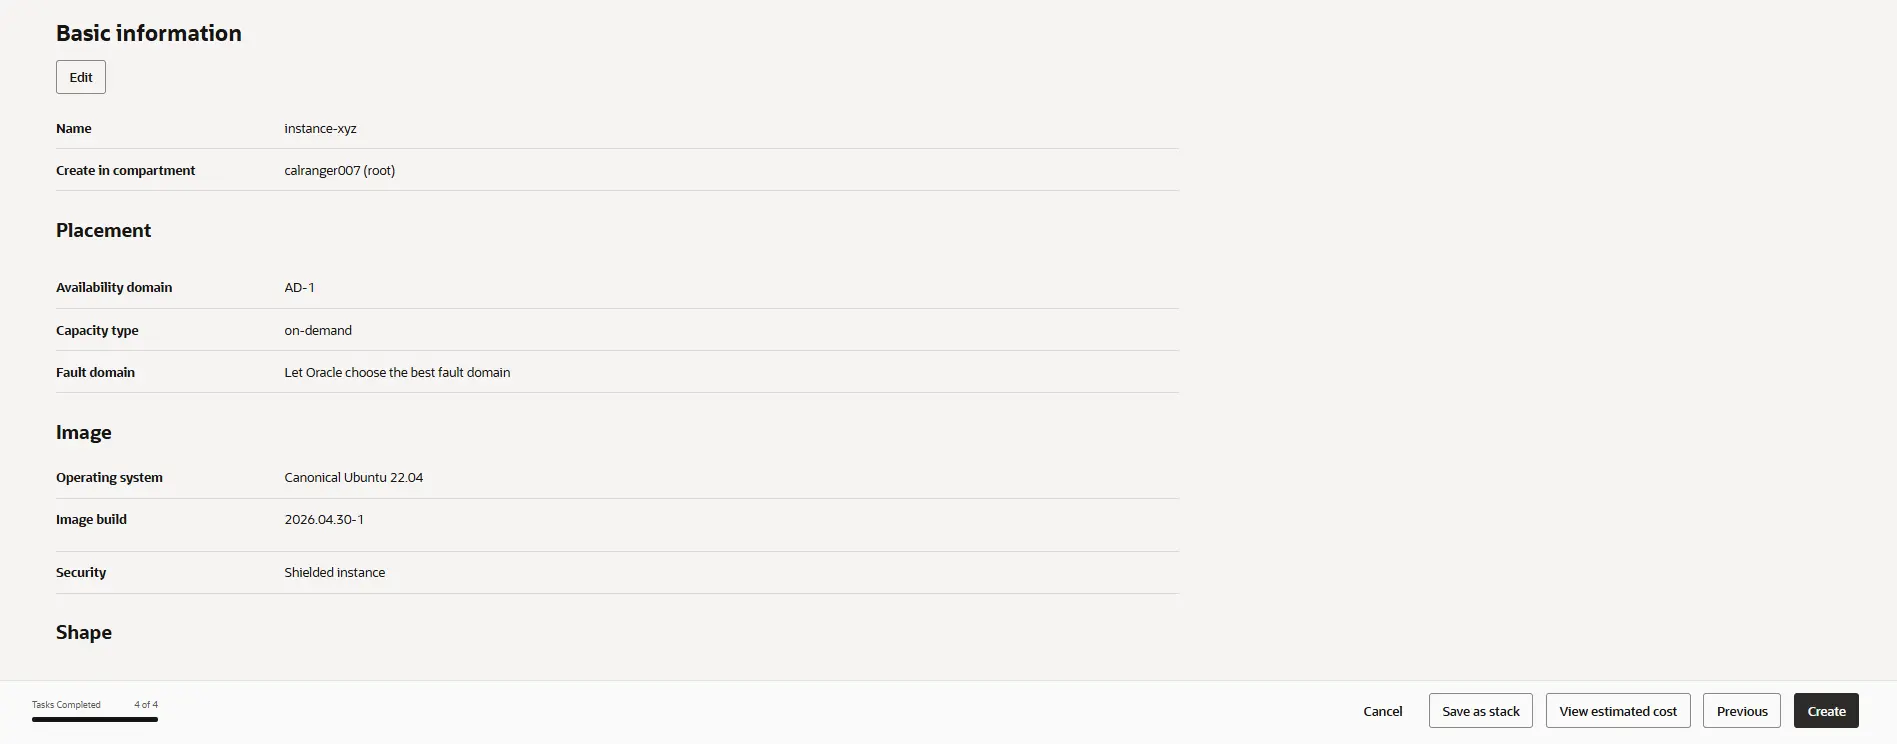
10. Important Note About OCI Quota Error
While creating more than one VM.Standard.E2.1.Micro instance, an OCI quota error may appear.
Example error:
vm-standard-e2-1-micro-count quota exceededThis means the tenancy or compartment quota allows fewer micro instances than required.
To fix it, go to:
Governance & Administration → Tenancy Management → Quota PoliciesFind the quota policy related to:
vm-standard-e2-1-micro-countIf the policy contains:
set compute quota vm-standard-e2-1-micro-count to 1 in tenancyChange it to:
set compute quota vm-standard-e2-1-micro-count to 2 in tenancyThen update the quota policy and try creating the instance again.
This is useful when creating two separate Always Free micro instances.
Step 2: Connect To The Instance Using the PuTTY
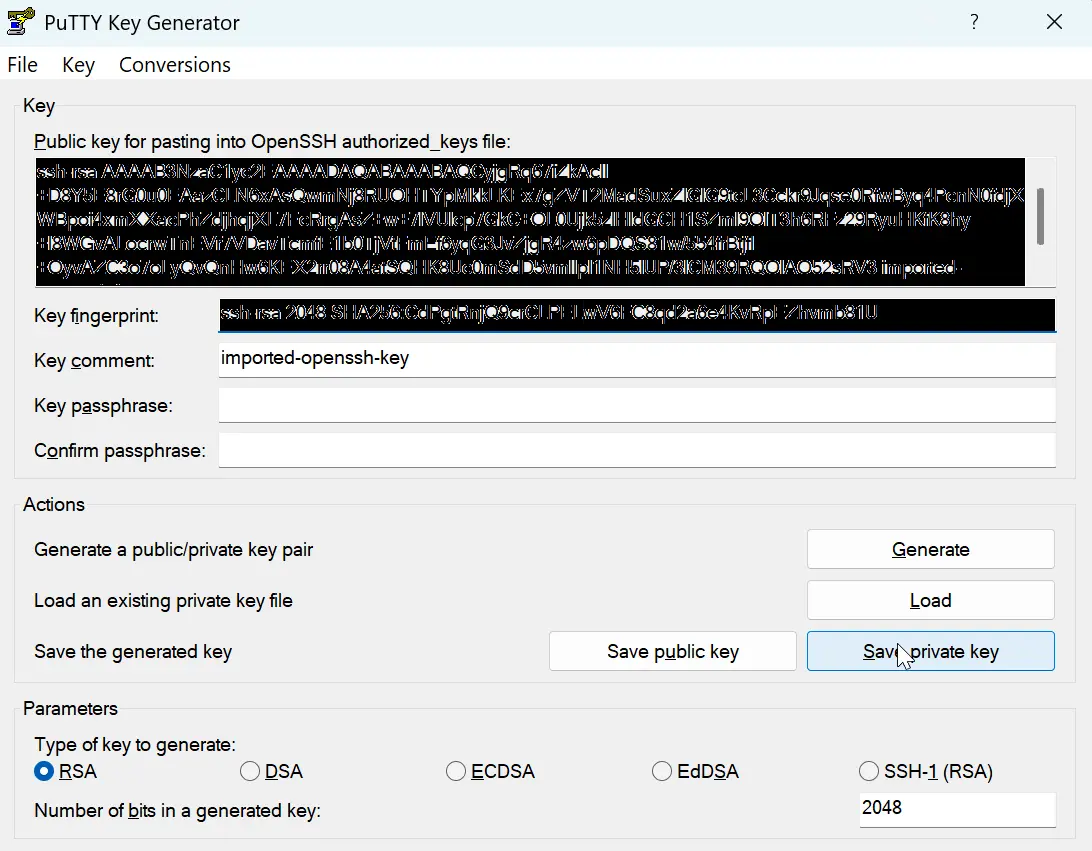
1. Convert OCI Private Key to PuTTY .ppk Format
Oracle Cloud downloads the private key in OpenSSH format. PuTTY on Windows usually
needs a
.ppk file.
So after downloading the private key, convert it using PuTTYgen.
Steps:
1. Open PuTTYgen by searching the keyword below:Apps:puttygen2. To select the SSH private key, click below:
Conversions → Import keyThis will import the OpenSSH private key into PuTTYgen.
3. Finally, click Save private key to save/download the converted.ppk file.
This .ppk file was later used in:
PuTTY
WinSCP
PuTTY was used for running Linux commands.
WinSCP was used for uploading and downloading backup files.
2. Connect to OCI Server Using PuTTY
To connect using PuTTY:
Open PuTTY and then go to:
Connection → SSH → Auth → Credentials.ppk key.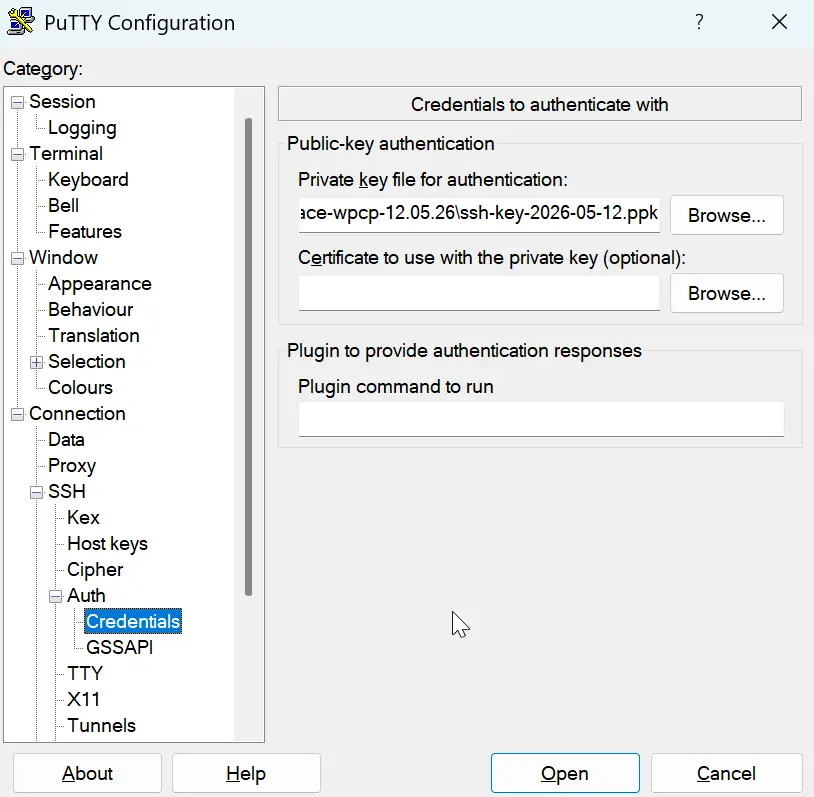
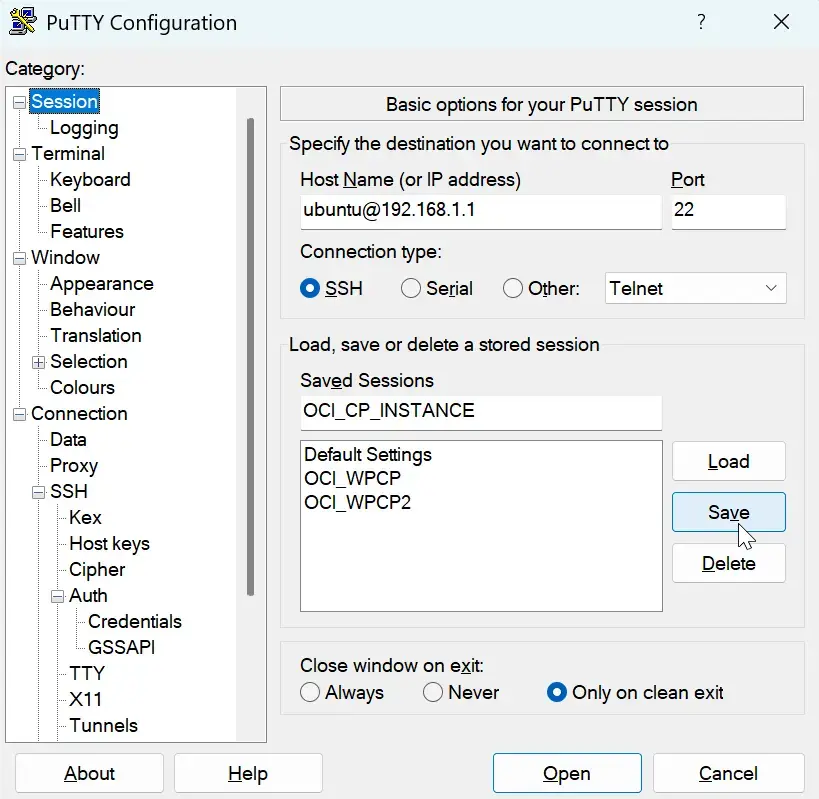
Now go back to the Session screen in PuTTY and enter the details below:
Host Name: ubuntu@YOUR_OCI_PUBLIC_IP
Port: 22
Connection Type: SSH
Saved Sessions: Give any name to this session
The .ppk private key should already be attached from the previous step:
Connection → SSH → Auth → CredentialsFinally, click Save to save the PuTTY session. After saving, click Open. PuTTY will open the terminal window and connect you to your OCI server.
Step 3: Verify server details
After connecting to the server with PuTTY, run the following commands to check the server details:
lsb_release -a
uname -m
free -h
df -h
The expected output should confirm the Ubuntu version, CPU architecture, RAM, swap, and disk size.
Ubuntu 22.04.x LTS
x86_64
RAM around 956 MiB
Swap 0B initially
Disk around 47 GB
Example output:
No LSB modules are available.
Distributor ID: Ubuntu
Description:    Ubuntu 22.04.5 LTS
Release:        22.04
Codename:       jammy
x86_64
               total        used        free      shared  buff/cache   available
Mem:           956Mi       209Mi       155Mi       1.0Mi       592Mi       582Mi
Swap:             0B          0B          0B
Filesystem      Size  Used Avail Use% Mounted on
tmpfs            96M  1.1M   95M   2% /run
efivarfs        256K   17K  235K   7% /sys/firmware/efi/efivars
/dev/sda1        45G  3.4G   42G   8% /
tmpfs           479M     0  479M   0% /dev/shm
tmpfs           5.0M     0  5.0M   0% /run/lock
/dev/sda15      105M  6.1M   99M   6% /boot/efi
tmpfs            96M  4.0K   96M   1% /run/user/1001
This confirms that the server is running the correct Ubuntu version, using the x86_64 architecture, and has the expected RAM and disk size.
Step 4: Update and upgrade Ubuntu Server
Before installing CyberPanel, update the server packages to make sure the system is ready:
sudo apt update
sudo apt upgrade -y
sudo rebootsudo reboot command will restart the server, so PuTTY will disconnect automatically.
Wait for one or two minutes and then reconnect using PuTTY.This update step is recommended before installing CyberPanel because it helps prevent package dependency and installation-related issues.Step 5: Add 2 GB swap memory
The OCI micro instance has only 1 GB RAM. CyberPanel, MariaDB, OpenLiteSpeed, PHP, and WordPress may become unstable without swap.
Create a 2 GB swap file:
sudo fallocate -l 2G /swapfile
sudo chmod 600 /swapfile
sudo mkswap /swapfile
sudo swapon /swapfile
Make the swap file permanent so it remains active after reboot:
echo '/swapfile none swap sw 0 0' | sudo tee -a /etc/fstabCheck whether swap is active:
free -hExpected output:
Swap: 2.0GiConfirm that the swap entry has been added to /etc/fstab:
cat /etc/fstabYou should see this line:
/swapfile none swap sw 0 0This confirms that swap is active and will remain enabled even after the server is rebooted.
Tune swap settings
Now tune the swap settings so Ubuntu uses RAM first and uses swap only when needed.
echo 'vm.swappiness=10' | sudo tee /etc/sysctl.d/99-cyberpanel-swap.conf
echo 'vm.vfs_cache_pressure=50' | sudo tee -a /etc/sysctl.d/99-cyberpanel-swap.conf
Apply the new settings:
sudo sysctl --systemCheck whether the settings were applied correctly:
cat /proc/sys/vm/swappiness
cat /etc/sysctl.d/99-cyberpanel-swap.conf
Expected output:
10
vm.swappiness=10
vm.vfs_cache_pressure=50
Step 6: Open Required OCI Ports
Oracle Cloud has a network firewall called Security List or Network Security Group. Oracle describes security lists as virtual firewalls for instances, where ingress and egress rules control allowed traffic.
1. Go to OCI Security List
In Oracle Cloud Console:
☰ Menu → Networking → Virtual Cloud NetworksOpen your VCN.
Then go to:
Security → Default Security List → Security RulesNow add ingress rules.
2. Add required ingress rules
| Source CIDR | Protocol | Destination Port | Purpose |
|---|---|---|---|
0.0.0.0/0 | TCP | 80 | HTTP website |
0.0.0.0/0 | TCP | 443 | HTTPS website |
YOUR_IP/32 | TCP | 22 | SSH PuTTY |
YOUR_IP/32 | TCP | 8090 | CyberPanel admin |
YOUR_IP/32 | TCP | 7080 | OpenLiteSpeed WebAdmin optional |
For easier setup during installation, you can temporarily use:
0.0.0.0/08090, but after setup, restrict it to your own IP.Minimum ports required for your case:22
80
443
80903. Also allow ports in Ubuntu firewall if active
Check UFW:
sudo ufw statusIf UFW is active, allow the required ports:
sudo ufw allow 22/tcp
sudo ufw allow 80/tcp
sudo ufw allow 443/tcp
sudo ufw allow 8090/tcp
sudo ufw reload
If UFW says inactive, no problem. In that case, OCI Security List or NSG rules are still the most important firewall settings.
Step 7: Install CyberPanel on OCI
Become root:
sudo su -Check that no apt process is running:
ps aux | grep -i aptIf you see only the grep line, fine.
Also run:
sudo lsof /var/lib/dpkg/lock-frontendStart CyberPanel installer:
sh <(curl https://cyberpanel.net/install.sh || wget -O - https://cyberpanel.net/install.sh)During installation, choose generally:
Install CyberPanel [Enter-1]
Install CyberPanel with OpenLiteSpeed [Enter-1]
Full service: No
Postfix: No
PowerDNS: No
Pure-FTPd: No
Remote MySQL: No
Memcached: No
Redis: No
WatchDog: Yes
For your 1 GB RAM server, I recommend:
Redis: No initially
Memcached: No initially
Example:
                CyberPanel Installer v2.4.7

1. Install CyberPanel.

2. Exit.


  Please enter the number[1-2]: 1

                CyberPanel Installer v2.4.7

RAM check : 511/1963MB (26.03%)

Disk check : 19/68GB (27%) (Minimal 10GB free space)

1. Install CyberPanel with OpenLiteSpeed.

2. Install Cyberpanel with LiteSpeed Enterprise.

3. Exit.


  Please enter the number[1-3]: 1


Install Full service for CyberPanel? This will include PowerDNS, Postfix and Pure-FTPd.

Full installation [Y/n]: n

Install Postfix? [Y/n]: n

Install PowerDNS? [Y/n]: n

Install PureFTPd? [Y/n]: n

Do you want to setup Remote MySQL? (This will skip installation of local MySQL)

(Default = No) Remote MySQL [y/N]: n

Local MySQL selected...

Press Enter key to continue with latest version or Enter specific version such as: 1.9.4 , 2.0.1 , 2.0.2 ...etc

Branch name set to v2.4.7

Please choose to use default admin password 1234567, randomly generate one (recommended) or specify the admin password?
Choose [d]fault, [r]andom or [s]et password: [d/r/s]
Admin password will be provided once installation is completed...


Do you wish to install Memcached process and its PHP extension?
Please select [Y/n]: n

Do you wish to install Redis process and its PHP extension?
Please select [Y/n]: n

Would you like to set up a WatchDog (beta) for Web service and Database service ?
The watchdog script will be automatically started up after installation and server reboot
If you want to kill the watchdog , run watchdog kill
Please type Yes or no (with capital Y, default Yes): Yes
Keep the setup simple first. You can enable caching later if memory allows.
Once Cyberpanel will installed successfully, it will ask “would you like to restart your server now?” Entrer “Y”.
Step 8: Verify CyberPanel services after reboot
Reconnect with PuTTY. Check OpenLiteSpeed:
sudo systemctl status lswsExpected:
Active: active (running)Press q to exit the service status screen.
qCheck CyberPanel service:
sudo systemctl status lscpdExpected:
Active: active (running)Check MariaDB:
sudo systemctl status mariadbExpected:
Active: active (running)
Status: Taking your SQL requests now
Check port 8090:
sudo ss -tulpn | grep 8090Expected:
0.0.0.0:8090Step 9: Reset CyberPanel password
If you forgot the CyberPanel password, reset it from PuTTY. Become root:
sudo su -Reset the CyberPanel admin password:
adminPass 'YourNewStrongPassword2026'Use single quotes if the password contains special characters like &, $, or !.
Then log in again:
https://YOUR_OCI_PUBLIC_IP:8090
Username: admin
Password: YourNewStrongPassword2026
Step 10: Login To The CyberPanel in browser
First, get your OCI public IP:
curl ifconfig.meIt will show something like:
150.xxx.xxx.xxxNow open this URL in your Windows browser:
https://YOUR_OCI_PUBLIC_IP:8090Example:
https://150.xxx.xxx.xxx:8090You may see a browser warning like Your connection is not private. This is normal because CyberPanel initially uses a self-signed certificate. Click:
Advanced → ProceedUse:
Username: admin
Password: the password shown/generated during CyberPanel installation
After login, immediately change the admin password if needed.
If it does not open
Your OCI rule for port 8090 may be restricted to this IP:
157.49.51.152/32If your ISP changed your public IP, the page will not open. Check your current public IP on your Windows browser by searching:
what is my ip157.49.51.152, update the OCI ingress rule for port 8090, or temporarily use:0.0.0.0/0 → TCP → 8090Once you can log in to CyberPanel, the next step is to create or restore your WordPress site backup from DigitalOcean.
Step 11: Create Backup from Old DigitalOcean CyberPanel
Log in to the old DigitalOcean CyberPanel.
Go to:
Backup → Create BackupSelect the website and choose the backup destination:
HomeClick:
Create BackupAfter completion, verify the backup from the DigitalOcean terminal:
ls -lh /home/example.com/backup/
cat /home/example.com/backup/status
Example:
ls -lh /home/prowebmentor.com/backup/
cat /home/prowebmentor.com/backup/status
Expected:
backup-example.com-date-time.tar.gz
Completed
Step 12: Transfer backup using WinSCP
WinSCP is a Windows file transfer tool that works over SFTP. PuTTY is for commands, while WinSCP is for transferring files.
1. Download from DigitalOcean
Connect WinSCP to the old DigitalOcean server:
Protocol: SFTP
Host: OLD_DIGITALOCEAN_PUBLIC_IP
Port: 22
Username: root/home/example.com/backup/You should see:
backup-example.com-05.13.2026_17-15-58.tar.gz
status
Download the backup file to your Windows PC.
If a permission error occurs, run this command on the old server:
chmod 644 /home/example.com/backup/backup-example.com-date-time.tar.gz2. Upload to OCI
Open a new WinSCP session.
Connect to the new OCI server:
File protocol: SFTP
Host name: OCI_PUBLIC_IP
Port: 22
Username: ubuntu
Private key: your OCI .ppk key
Upload the backup file to:
/home/ubuntu/Then in PuTTY, move it to the CyberPanel backup folder:
sudo mkdir -p /home/backup
sudo mv /home/ubuntu/backup-example.com-date.tar.gz /home/backup/
sudo chmod 644 /home/backup/backup-example.com-date.tar.gz
ls -lh /home/backup/
Expected:
backup-example.com-date.tar.gzStep 13: Restore Backup on OCI CyberPanel
Log in to the new CyberPanel.
Go to:
Backup → Restore BackupSelect the uploaded backup file.
Click:
RestoreWait until the restoration completes.
Because the server has only 1 GB RAM, do not run other heavy tasks during the restore process.
After the restore, check the website files:
sudo ls -la /home/example.com/public_html/ | headYou should see:
wp-admin
wp-content
wp-includes
wp-config.php
Also check:
CyberPanel → Websites → List WebsitesBackup → Restore Backup
Step 14: Fix WordPress file ownership and permissions
After restore, check file ownership:
sudo ls -la /home/example.com/public_html/ | headYou should see, something like below:
drwxr-x--- 5 wnetl1574 nogroup 4096 May 12 14:38 .
drwx--x--x 11 wnetl1574 wnetl1574 4096 May 13 17:15 ..
-rw-r--r-- 1 docker docker 875 Oct 18 2025 .htaccess
-rw-r--r-- 1 docker docker 3654 Dec 20 2024 .htaccess.bk
In this example, the site owner is wnetl1574 but the file owner is docker. This is not ideal.
This can cause WordPress problems later, such as:
Cannot upload media
Cannot update plugins/themes
Cannot edit .htaccess
Permission errors
So fix ownership now.:
sudo chown -R wnetl1574:nogroup /home/example.com/public_html/Fix directory permissions:
sudo find /home/example.com/public_html/ -type d -exec chmod 755 {} \;Set public_html permission:
sudo chmod 750 /home/example.com/public_html/Verify:
sudo ls -la /home/example.com/public_html/ | headExpected:
drwxr-x--- 5 wnetl1574 nogroup 4096 May 12 14:38 .
drwx--x--x 11 wnetl1574 wnetl1574 4096 May 13 17:15 ..
-rw-r--r-- 1 wnetl1574 nogroup 875 Oct 18 2025 .htaccess
-rw-r--r-- 1 wnetl1574 nogroup 3654 Dec 20 2024 .htaccess.bk
Step 15: Test website before changing Cloudflare DNS
Before changing Cloudflare DNS, test the restored site privately from your own Windows PC.
1. Open CMD as Administrator
Search:
cmdRight-click:
Command Prompt → Run as administrator2. Run This Command
notepad c:\Windows\System32\drivers\etc\hostsNow the hosts file will open in Notepad.
Edit it, then click:
File → SaveExample entry
Add lines like this at the bottom:
150.xxx.xxx.xxx example.com
150.xxx.xxx.xxx www.example.com
3. Flush DNS After Saving
In CMD as Administrator, run:
ipconfig /flushdnsThen test the website in your browser.
If Notepad says “Access denied”
It means CMD was not opened as Administrator.
Close CMD and open it again using:
Run as administrator4. Test website
Open browser:
http://example.comTest:
Homepage
/wp-admin login
Images
CSS/JS
Contact forms
Permalinks
Plugins
Uploads
Forms
Speed
At this stage, HTTPS may not work properly because Cloudflare DNS is still pointing to DigitalOcean. Test mainly over HTTP first.
5. Fix permalinks
In WordPress admin:
Settings → Permalinks → Save ChangesDo not change anything. Just click Save Changes.
Step 16: Change Cloudflare DNS to OCI IP
Go to Cloudflare DNS for the domain.
Change:
A yourdomain.com OLD_DIGITALOCEAN_IPto:
A yourdomain.com OCI_PUBLIC_IPwww, either use:A www OCI_PUBLIC_IPor:
CNAME www yourdomain.comDuring SSL setup, keep proxy status:
DNS onlyDo not touch email records like:
MX
SPF
DKIM
Zoho verification
Google verification
After the DNS change, remove the hosts file entries from Windows.
Flush DNS:
ipconfig /flushdnsCheck DNS:
nslookup yourdomain.comExpected:
OCI_PUBLIC_IPStep 17: Issue SSL from OCI CyberPanel
Go to:
https://OCI_PUBLIC_IP:8090Then in CyberPanel:
Websites → List Websites → w3netlab.com → ManageFind the SSL option and issue SSL for:
yourdomain.com
www.yourdomain.com
Before issuing SSL, confirm in Cloudflare that both records are set to DNS only:
A      yourdomain.com    OCI_PUBLIC_IP    DNS only
CNAME  www             yourdomain.com    DNS only
After SSL issue
Open:
https://yourdomain.comAlso check:
https://www.yourdomain.comIf both open without warning, then you can turn Cloudflare proxy back to Proxied and set SSL mode to Full (strict).
Step 18: Create Subdomain For The Cyberpanel
CyberPanel should not be accessed permanently using IP.
Instead, create a subdomain like:
cp.yourdomain.comExample:
cp.w3netlab.com
cp.prowebmentor.com
In Cloudflare DNS, add:
Type: A
Name: cp
Content: OCI_PUBLIC_IP
Proxy status: DNS only
TTL: Auto
Important:
cp.yourdomain.com must remain DNS only.
Do not enable Cloudflare proxy for CyberPanel port 8090.
Now set the hostname on the server:
sudo hostnamectl set-hostname cp.yourdomain.comEdit the hosts file:
sudo nano /etc/hostsAdd:
127.0.1.1 cp.yourdomain.com cpSave:
Ctrl + O → Enter → Ctrl + XCheck:
hostname
hostname -f
Expected:
cp.yourdomain.com
cp.yourdomain.com
Now in CyberPanel, issue Hostname SSL:
SSL → Hostname SSLor click:
Issue Hostname SSLUse:
cp.yourdomain.comRestart CyberPanel:
sudo systemctl restart lscpdNow access CyberPanel using:
https://cp.yourdomain.com:8090The certificate should show the correct domain.
It may be issued by:
Let’s Encryptor:
ZeroSSLBoth are okay if the browser shows the certificate as valid and trusted.
Step 19: Enable Cloudflare proxy safely
After website SSL works, you can enable Cloudflare proxy for the main website.
For website records:
yourdomain.com → Proxied
www → Proxied
For CyberPanel admin:
cp.yourdomain.com → DNS onlyDo not proxy the CyberPanel subdomain.
In Cloudflare SSL/TLS settings, use:
Full (strict)Avoid:
FlexibleFlexible SSL may cause redirect loops and WordPress SSL problems.
Step 20: Install LiteSpeed Cache plugin
Since CyberPanel uses OpenLiteSpeed, install the LiteSpeed Cache plugin in WordPress.
Go to:
WordPress Admin → Plugins → Add NewSearch:
LiteSpeed CacheInstall and activate the plugin.
Step 21: Recommended LiteSpeed Cache settings for 1 GB OCI server
Use simple and safe settings.
Cache tab
Enable Cache: ON
Cache Logged-in Users: OFF
Cache Commenters: OFF
Cache REST API: OFF initially
Cache Login Page: ON
Cache Mobile: OFF initially
TTL tab
Default values are okay:
Default Public Cache TTL: 604800
Default Front Page TTL: 604800
Default Private Cache TTL: 1800
404 TTL: 3600
500 TTL: 600
Purge tab
Keep:
Purge All On Upgrade: ON
Auto purge front page, home page, pages, archives: ON
Serve Stale: OFF
Excludes tab
Keep Elementor preview excluded:
action=elementor
preview=true
ESI tab
Enable ESI: OFFObject tab
For 1 GB RAM:
Object Cache: OFFIf it shows:
Connection Test: Failedthat is okay when Object Cache is OFF.
Browser tab
Browser Cache: ON
Browser Cache TTL: 86400
This means 1 day browser cache.
Advanced tab
Keep:
AJAX Cache TTL: Empty
Login Cookie: Empty
Vary Cookies: Empty
Improve HTTP/HTTPS Compatibility: OFF
Instant Click: OFF
Step 22: Verify LiteSpeed Cache is working
From SSH, run:
curl -I https://yourdomain.comRun it twice. Look for:
x-litespeed-cache: hitExample good output:
x-powered-by: CyberPanel-OLS
x-turbo-charged-by: LiteSpeed
x-litespeed-cache: hit
server: cloudflare
cf-cache-status: DYNAMIC
This means:
LiteSpeed Cache is working on your server.
Cloudflare proxy is also active.
cf-cache-status: DYNAMIC is normal. It means Cloudflare is not caching the HTML page, but LiteSpeed is caching it at the origin server.
Frequently Asked Question [FAQ]
CyberPanel Login Page Not Loading?
Most likely reason: your public IP changed, or the IP you added in OCI Security List is not the same IP Cloud/OCI sees for your connection.
Your website loads because ports 80 and 443 are open to everyone. CyberPanel does not load because port 8090 is restricted to only your IP.
Why is my website loading but CyberPanel is not loading?
Your website uses normal web ports:
80 = HTTP 443 = HTTPSCyberPanel uses a different admin port:
8090So it is possible for the website to load correctly while CyberPanel does not load.
This usually means:
Ports 80 and 443 are open ✅
Port 8090 is blocked or restricted ❌
If you recently changed the OCI security rule for CyberPanel like this:
Source CIDR: your-ip/32 Protocol: TCP Destination Port: 8090then CyberPanel will only open from that exact public IP address.
How do I check my current public IP?
On your PC, open browser and visit:
https://api.ipify.org/Copy the IPv4 address.
Then update the OCI security rule like this:
Source CIDR: your-current-ip/32 Protocol: TCP Destination Port: 8090Example:
157.49.51.152/32 → TCP → 8090How do I confirm if OCI rule is the issue?
8090 rule to:0.0.0.0/0 → TCP → 8090Then try:
https://cp.yourdomain.com:8090If CyberPanel opens, the problem was your IP restriction.
After testing, change the rule back to your current IP:
your-current-ip/32 → TCP → 8090What should Cloudflare setting be for CyberPanel?
For example:cp subdomain must be:DNS onlyCorrect:
A cp SERVER_PUBLIC_IP DNS onlyWrong:
A cp SERVER_PUBLIC_IP Proxied8090.How do I check if CyberPanel is running?
SSH into the server and run:
sudo systemctl status lscpdExpected:
Active: active (running)If it is not running, restart the CyberPanel service:
sudo systemctl restart lscpdHow do I check if port 8090 is listening?
Run:
sudo ss -tulpn | grep 8090Expected:
0.0.0.0:8090How do I test from Windows?
Open PowerShell:
Test-NetConnection cp.yourdomain.com -Port 8090If it shows:
TcpTestSucceeded : Truethen port 8090 is reachable.
If it shows:
TcpTestSucceeded : Falsethen the firewall, OCI security rule, or IP restriction is blocking the connection.
Can I enable Redis/Memcached later?
Redis and Memcached will consume extra RAM. On your server, RAM is already low, so enabling them may push memory pressure higher and increase swap usage.
You already have the most important cache working:
x-litespeed-cache: hitThat means LiteSpeed page cache is working. For normal visitors, this gives the biggest performance benefit.
Best setup for your current servers
Keep this setup:
LiteSpeed Cache: ON
Object Cache: OFF
Redis: OFF
Memcached: OFF
Cloudflare Proxy: ON
Browser Cache: ON
This is the safest setup for a 1 GB RAM server.
Redis vs Memcached: which one if needed later?
If you ever decide to use object cache later, choose Redis only.
Do not enable both Redis and Memcached.
Recommended priority:
First choice: Redis
Second choice: Memcached
Never both on 1 GB RAM
Redis is generally more useful for WordPress object caching.
When Redis can help
Redis may help if your site has:
Many logged-in users
WooCommerce
Membership system
Heavy admin dashboard
Many database queries
Dynamic uncached pages
But for a normal cached WordPress website, Redis may not noticeably improve public page speed.
What to monitor instead
Run this occasionally:
free -hExample Output:
     total used free shared buff/cache available
Mem: 956Mi 399Mi 71Mi  72Mi 485Mi      324Mi
Swap:2.0Gi 463Mi 1.5Gi
If swap usage stays low/moderate and the site is fast, your setup is fine.
Also check LiteSpeed cache (Run it 2–3 times:):
curl -s -o /dev/null -D - https://yourdomain.com | grep -i litespeed
curl -s -o /dev/null -D - https://yourdomain.com | grep -i litespeed
curl -s -o /dev/null -D - https://yourdomain.com | grep -i litespeed
Expected Output (If LS Cache Active):
x-litespeed-cache: miss
x-turbo-charged-by: LiteSpeed
x-litespeed-cache: hit
x-turbo-charged-by: LiteSpeed
x-litespeed-cache: hit
x-turbo-charged-by: LiteSpeed